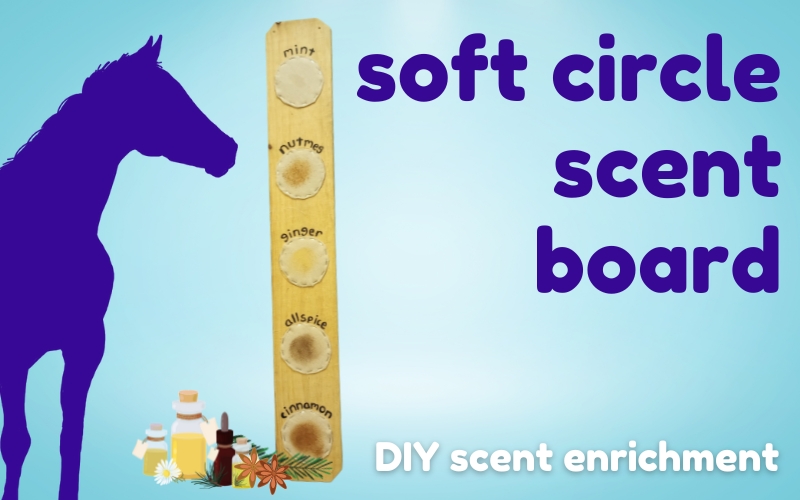
This DIY project gives you a very cute place to apply scent enrichment for your horse’s boredom relief and wellness. The canvas circles are padded, creating a soft surface that’s perfect for applying and diffusing all kinds of appealing scents. If your horse enjoys scent enrichment, this project is a fun way to create the perfect place for their favorite smells. Here’s how to make this soft circle scent board for equine enrichment, step by step.
What is the Soft Circle Scent Board?
This scent board is a piece of equipment used for sensory enrichment.
You build it, install in your horse’s stall or pasture, and apply various scents to the soft pads. The pads provide a place for each smell and keep the scent confined to a small area for your horse to sniff or ignore as they prefer.
This DIY boredom buster for horses uses an inexpensive wood plank, any fabric, and whatever scents you prefer. You’ll need a few tools for this project and it’ll probably take less than two hours start to finish.
What is Equine Scent Enrichment?
Scent enrichment for horses means adding scents to your horse’s environment.
Why give your horse things to smell?
Because your horse’s sensitive sense of smell is incredibly important to them! But compared to the wild landscape that your horse’s ancestors evolved in, stalls and even paddocks are fairly sensory-poor environments. There’s not a lot of smells available, and they’re usually the same day after day.
Enrichment for horses means providing opportunities for behavior and stimulation. We need to give horses options to act and experience the world like horses – this helps avoid boredom and behavior problems.
Scent enrichment means making a plan to add some scents – natural or not – to your horse’s environment and change them frequently.
Why Scent Boards for Horses?
I love scent boards for horse enrichment because it keeps the scent in one spot. You want your horse to have the option of interacting with their enrichment or not, and this is a great way to do it.
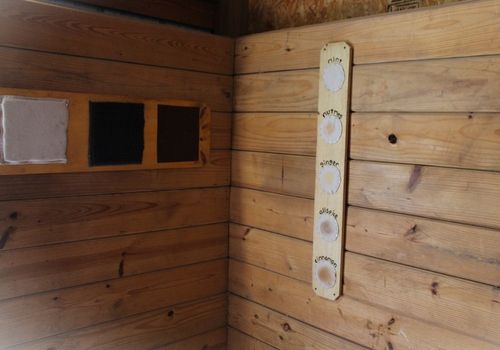
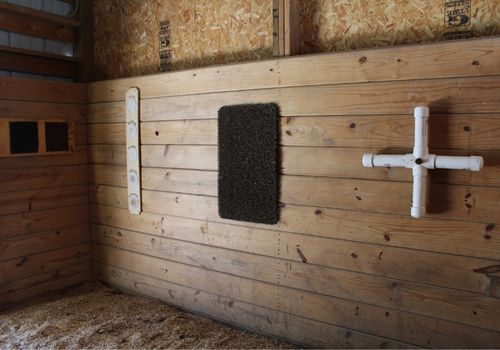
Here’s the scent board in a stall next to a DIY scratching board:
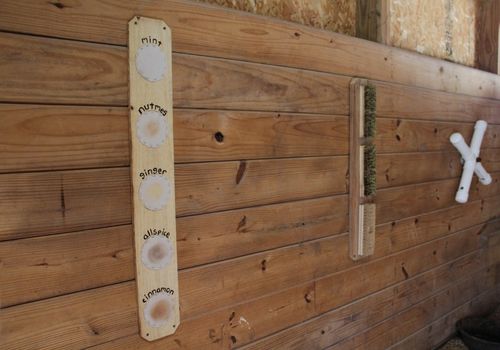
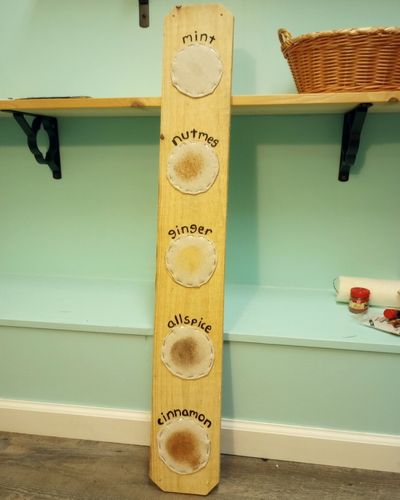
This board is labeled with different scents, but you can make yours unlabeled for maximum flexibility. And putting the scents on a scent board for horses makes it easy to remove the board if it needs repair or if you change stalls or stables.
There are other types of sensory boards that help make your horse’s environment more interesting. You might want to check out the Sensory Texture Board for a tactile version that lets your horse feel different materials during stall time.
How to Make the Soft Circle Scent Board
This is not a complicated build, but there’s a lot of steps. I’ve tried to include photos of every step, but it’s also okay to go your own way and just use this board as inspiration.
What You Need
For the board:
- One wood board, 1″x6″ or similar (I’m using an inexpensive wood fence plank)
- Circular saw (you can also use hand tools)
- Drill and bits for drilling pilot holes and mounting the board
- Carpenter’s square (optional but helps keep things nice and square)
- Sandpaper or an orbital sander
For the soft circle pads:
- Canvas or other heavy fabric, about 1/4 yard
- Quilt batting, fleece, felt or other soft fabric, 1/4 yard
- Round object like a jar or can for tracing circles
- Pencil or pen
- Scissors
- Staple gun and staples, 1/2″ length
Optional labels:
- Craft paint and brushes
As you can see, this build does require some tools. It’s the same tool set as most other DIY stable projects including the stall scratching pads tutorial.
These tools aren’t hard to use and will let you create all kinds of horse enrichment, plus stable repairs. If you board, most barns will also have these fundamental tools in their work area.
Important Note: Choosing and Using Staples
The soft circle scent board for horses uses hardware staples, which you install into wood using a staple gun.
When made as shown, with long staples correctly driven into the wood, the staples hold down the fabric very well. They won’t tear out or fall out in their own.
However, the ends of the staples are sharp, and a loose one could cause injury to a horse’s eye if they ran into a loose staple just the right way. This means it’s very important to choose long staples. I’m using these 1/2″ staples, but you’ll need to select staples that fit your tool. If any of the staples don’t go into the wood all the way, tap them in with a hammer or remove them and staple again.
Enrichment safety is hugely important on the blog, so don’t make any enrichment that you feel may not be safe for your horse’s situation. If your horse is especially mouthy, anxious, or bored, try this no-staple DIY Scent Board that conceals all the hardware on the reverse of the board.
Step 1: Make the Board
In this step, you’ll prepare a simple wood board by cutting it to length and rounding the corners for safety.
I’ll keep it short and simple here, relying on the photos to cover each step. If you need more detailed instructions on measuring and squaring the wood, head over to the DIY Texture Board article for lots of detail.
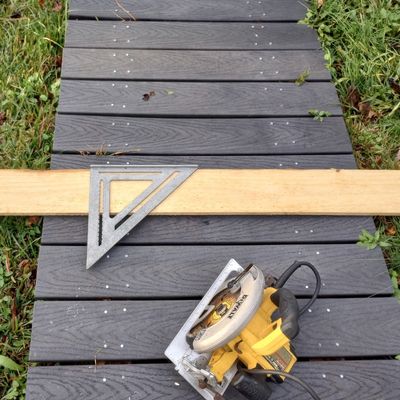
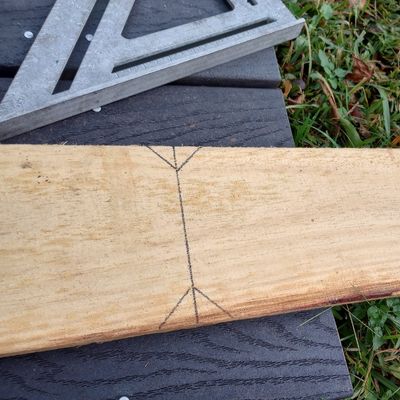
Cut your board to the length you prefer. The longer the board, the more scents you can apply – I started with a cheap picket fence board and cut this portion to about 3.5 feet. Use a carpenter’s square for straight edges.
Mark the corners with the square (or just wing it using your pencil) and saw off the pointed corner tips.
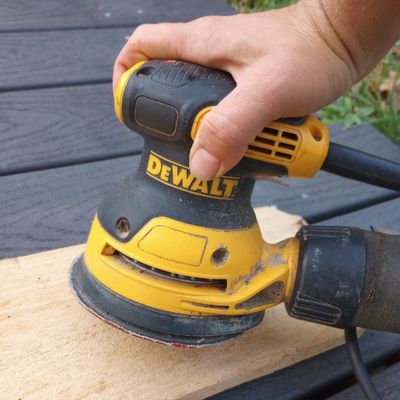
Next, sand down the board using sandpaper or an orbital sander. This step is optional, but makes the finished board look cleaner and more put together. If you want to label the fabric circles for individual scents, you’ll definitely want to sand down the board to make it smoother and easier to write or paint on.
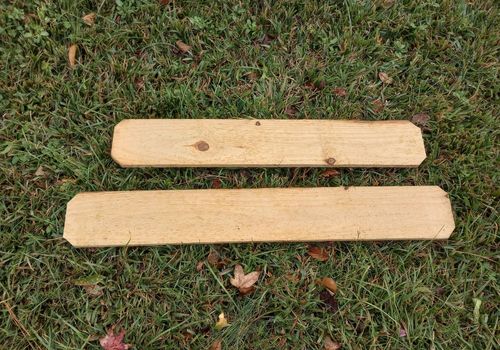
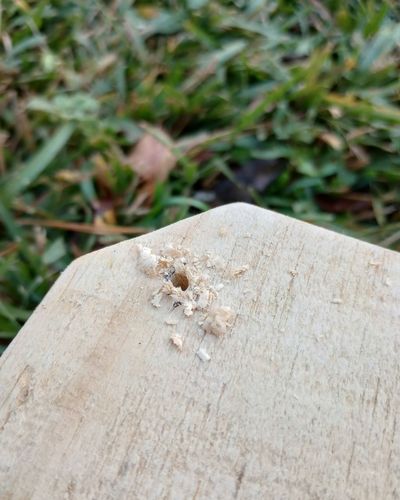
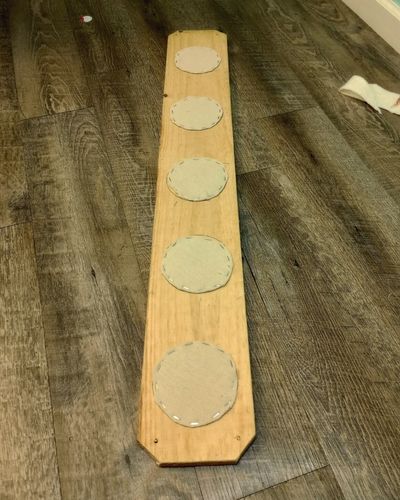
Your finished board will look similar to this:
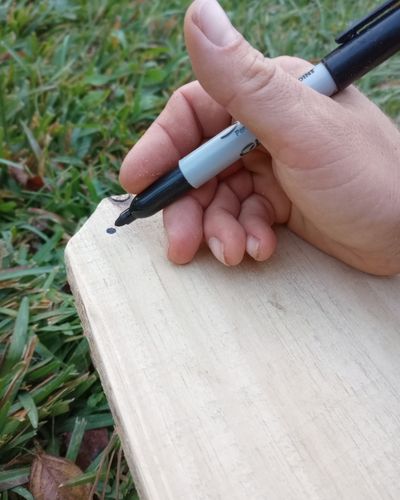
Lastly, use a drill with a standard fluted drill bit and make a pilot hole in each corner. This makes it much faster and easier to install the board in your horse’s stall or pasture, and prevents the wood from splitting.
Step 2: Cut Out the Soft Circles
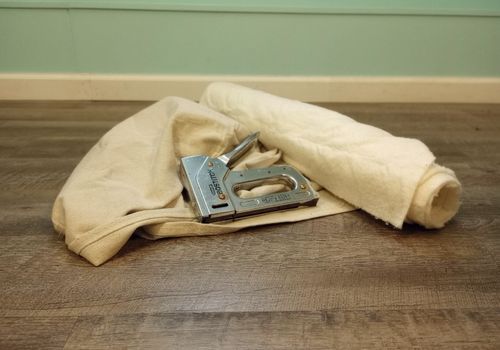
Grab your board and head indoors. For this part of the project, you’ll need some heavy fabric such as canvas, and some soft inner fabric such as fleece or quilt batting. You’ll also need a handheld staple gun.
Tip: If you don’t have piles of fabric taking up space (like me), you can use several layers of craft felt. You can find felt in the art aisle of local dollar or discount stores.
The canvas or other heavy fabric is durable and provides the scented surface. The batting, felt or fleece makes the circles a little squashy to the touch. They’re optional, but give extra texture to the scent board as well as holding onto more scent.
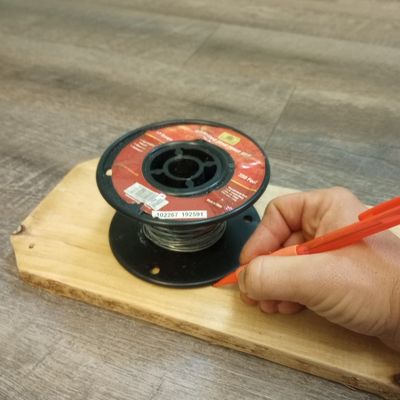
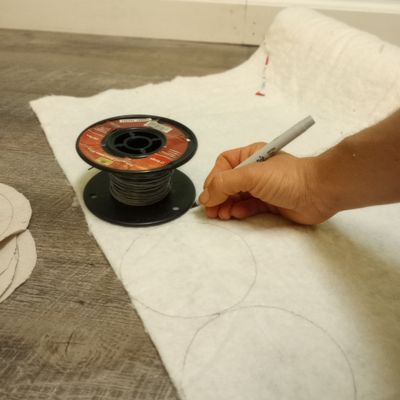
Using a soup can, jar, or other round object (I’m using a spool of fence wire in true horseperson fashion), trace circles onto the board to determine how many circles you’ll make.
Use the same object to trace the right amount of circles onto the fabric, using a soft pencil or felt tip pen. Leave space between each circle as shown.
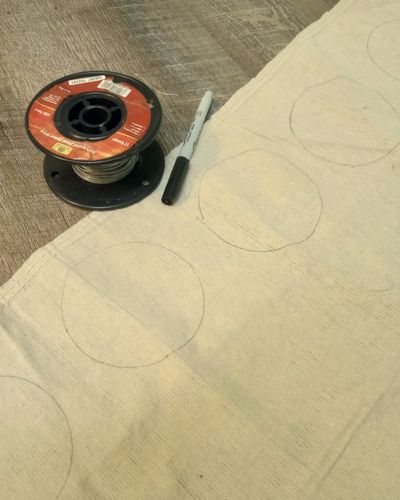
When you cut the circles out, you’ll need to cut them about half an inch bigger all around because you’ll fold the circles around the soft fabric in the middle. This disguises the rough edges. Cut them out as shown:
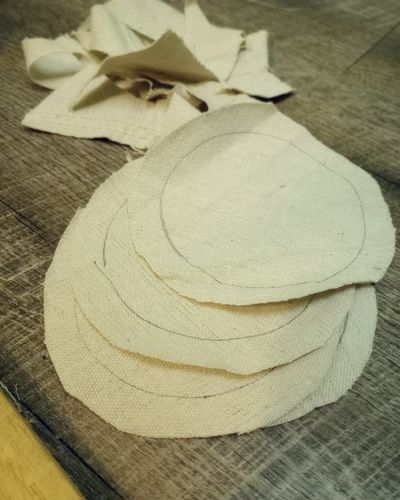
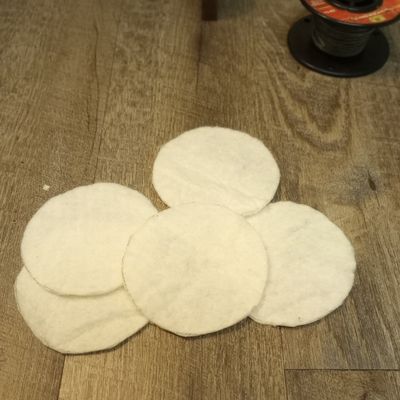
Repeat the tracing onto the fleece or batting. Cut these along the line, no extra needed.
Step 3: Notch the Circles and Test Fit
The finished scent board has no exposed fabric ends because you’ll tuck the edges of the fabric underneath before stapling them down.
To make them fold down smoothly, cut notches on each circle almost to your tracing line. This keeps the fabric from folding in a straight line, so you end up with cute, correct circles.
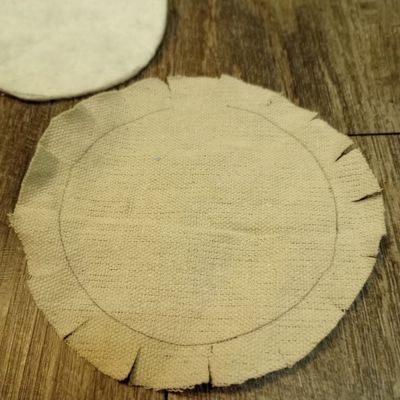
Don’t cut all the way to the tracing line. Leave a few millimeters of fabric in each notch.
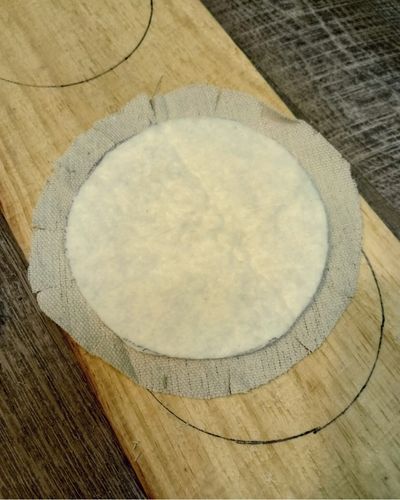
Place the inner, smaller circles of padding on each fabric circle to check for fit. It should look like this:
Now you’re ready to staple the circles down and finish your horse’s scent board!
Step 4: Staple the Soft Circles to the Scent Board
First things first: this step can be a little tricky as you work to fold each notch and maneuver your staple gun. It may seem like the fabric is trying to squirm out from under your fingers or the staples are going in crooked.
Just take your time and don’t worry if it doesn’t come out perfect. Your horse won’t care – they’ll appreciate the scent enrichment regardless!
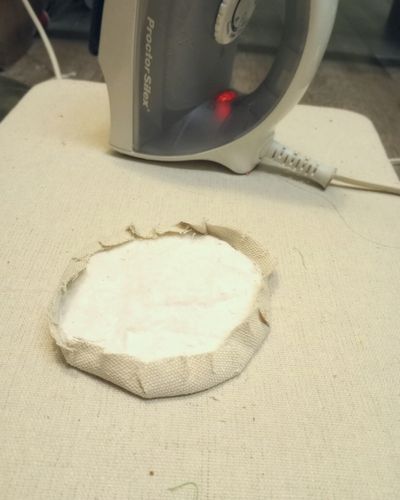
Working with one circle at a time, keep the circle fabrics together, with the soft layer centered in the outer fabric. Place them on the wooden board together, soft fabric touching the wood.
Center the fabric on the wood. Remember that your fabric circle will look big right now because it’s cut large in order to fold under.
Carefully fold the outer fabric under itself and line up the folded edge with the edge of the circle you traced on the wood board. The “wood side” of the board will look like this (don’t forget to turn it over before you staple). I’m using an iron to press down the folds, which takes a little extra time but makes stapling clean edges faster.
Staple the fabric to the board, close to the fold.
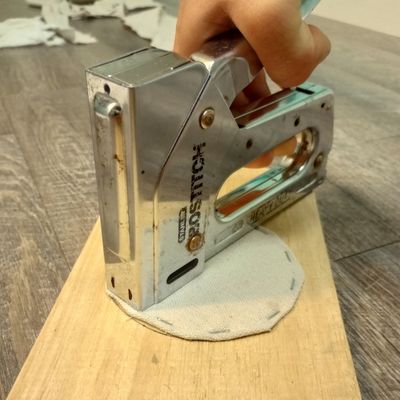
Move about an inch away and fold down the next notch, making sure to tuck the inner soft fabric into the fold as you go. Staple again.
Repeat, moving around the circle and turning the board as you need. Stretch the fabric gently to remove any small wrinkles as you go. Use the circle you traced on the wooden board to guide you, but don’t worry if it comes out not quite round.
Continue until you’ve stapled down all the fabric circles. It’ll be a lot of staples and a lot of fiddling around, but the end result is some super cute enrichment!
If any of the staples don’t go into the wood correctly or stick out of the fabric, tap them down securely with a hammer or other metal object.
Step 5: Apply Scents!
With the fabric pads complete, you’re ready to add some smells to the board.
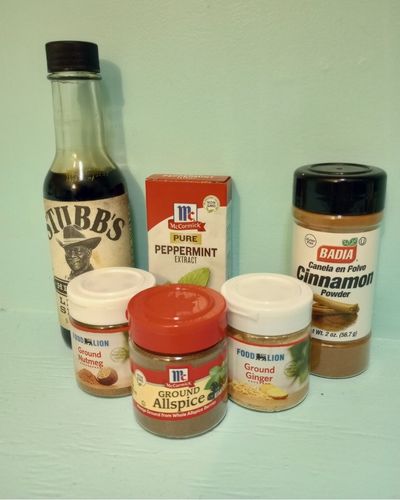
The scents you use are entirely up to you and your horse’s preference. If you’re new to the world of scent enrichment for horses, you might find this article – 5 Easy Scent Ideas for Equine Enrichment – a good place to start.
I’m using fall-themed scents for this board, as this tutorial was written during fall and pairs well with another scent inspiration post, Fall Themed Scents for Horse Enrichment.
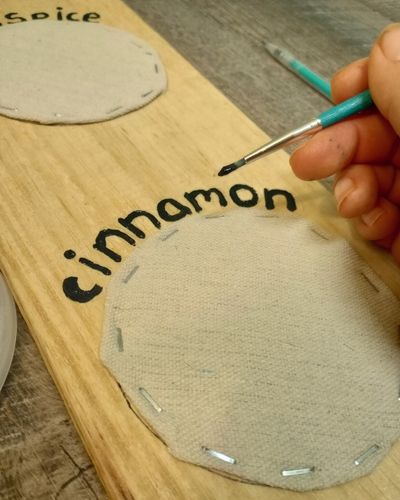
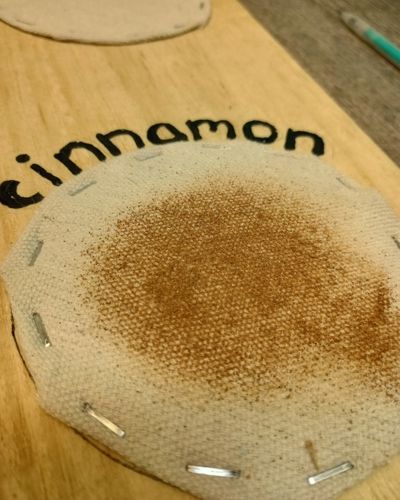
To personalize this themed board, I used craft paint to label each pad. But if you want a basic, multipurpose scent board for your horse’s stall or pasture, you can leave it unlabeled.
Add a small amount of each scent product to the circles and rub it in. If you’re worried about mess or have curious pets at home, you can do this part at the stable.
And it’s finished! Check for any loose fabric or rough wood edges, then congratulate yourself. Your equine scent enrichment soft circle board is ready for use!
Using Your Soft Circle Scent Board for Horse Enrichment
Use the pilot holes you made earlier to install the board using screws. This one is made to hang vertically, but a horizontal alignment is great too.
Add more scent to the board every few days, or alternate the scent options if your horse is on stall confinement 24/7 due to injury or illness.
Safety Note
It’s important to note that, while this board is sturdy and uses heavy duty staples to secure the fabric, horses are big and powerful animals. It’s unlikely that a horse would tear off and eat the fabric circles. But horses don’t always show good judgement or keep themselves safe.
Use this object under supervision for several sessions before leaving it in the stall. Also, make sure your horse’s other fundamental needs for welfare, like forage, are available at all times. This helps prevent boredom and anxiety especially during stall confinement.
If they have “busy lips” or seem too interested in the texture of the scented circles, make the scent board in a different style. Wrap the fabric around the board and secure it the back, with no visible staples. You can also add scent to a plain wooden board.
Related Enrichment
If you’re looking for more sensory enrichment ideas for your equine friend, the Sensory Enrichment Archive is a great place to find inspiration.