
Scents are perfect enrichment for your horse during stall time. Adding scent is a sensory activity that will give them essential variety and stimulation. This DIY scent board for horses is the perfect tool for adding scent enrichment to your horse’s stall. It offers endless scent variety and soothing aromatherapy. You can use this DIY scent board over and over, and it’s budget friendly! Here’s what a horse scent board is, why it’s great horse enrichment, and how to make it.
What is a Scent Board for Horses?
A scent board for horses is a way to give your horse sensory enrichment. It’s a solid board holding one or more pieces of fabric. You add the board to your horse’s stall and apply different scents to the fabric for your horse to enjoy.
Scent boards for horses are a DIY stall enrichment item. They’re not really a stall toy – scent boards for horses are there to provide variety and stimulation.
A scent board makes it easy to use different smells each day, and gives your horse control over whether they want a whiff of each smell. It’s perfect for providing low-key, relaxing, interesting sensory enrichment for your stalled horse.
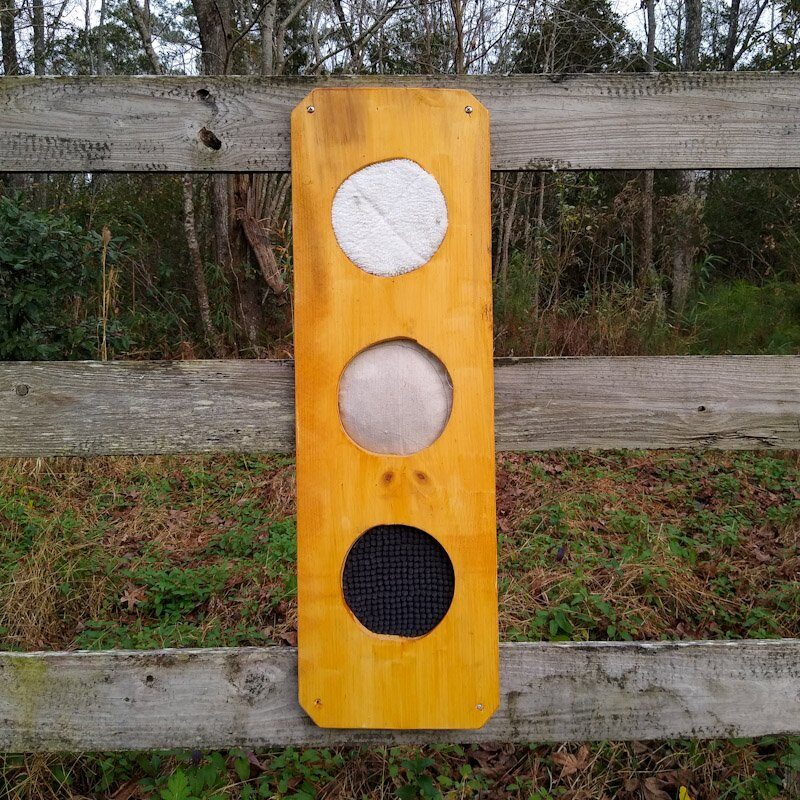
You can make your horse’s scent board in many shapes and sizes. In this article, we’ll demo a board with space for three scents, but yours can be smaller or larger. Since this is a DIY horse enrichment project, you’re free to make a scent board using whatever design and materials suit your equine friend the best.
Why the DIY Scent Board is Great Horse Enrichment
Enrichment is essential for your horse during stall time. It’s hard to keep your stalled horse entertained and free of boredom, but important for their health.
Scent boards provide sensory enrichment. After you’ve met your horse’s needs for herdmates and constant forage access during their stall time, it’s important to provide enough sensory stimulation. This means giving your horse the chance to use their senses and experience variety.
Sensory enrichment is essential – otherwise, the stall environment never changes. Since behavior problems can result from boredom, sensory enrichment is a must-have for stalled horses.
The scent board for horses is stall enrichment that targets the sense of smell. Scent enrichment for horses is a great stall addition for your horse because they have a very sensitive sense of smell. Your horse gets a lot of information about the world from their nose.
With scent enrichment, some smells are interesting because they’re new and unfamiliar. Others may be soothing and relaxing, a form of aromatherapy. Some scents – like your smell or the scent of their herd members – will help them feel connected and safe.
The DIY scent board is perfect horse enrichment because your horse can have almost endless variety in scent, adding crucial stimulation to their stall time.
Why the Scent Board is Great for You
The DIY scent board for horses is ideal enrichment for the equestrian on a budget. The scent board for horses is a perfect DIY that you can make with repurposed materials, so your equine enrichment budget goes further.
You’ll need some tools to make the board designed here, but it’s also possible to make a no-tool version. Along the same lines, the demo board in this post uses a sewing machine to make the scent pads – but you can create a no-sew scent board too. The DIY scent board is ideal because it’s accessible, fun and simple to make, but very effective at providing scent enrichment for horses.
Invest a couple hours in putting it together, and you’ll have a permanent enrichment addition to your horse’s stall or pasture.
What Behaviors does the DIY Scent Board for Horses Encourage?
Remember, enrichment for horses is all about encouraging their natural behaviors. And with this scent board, you’re giving your equine friend the chance to use their senses.
That’s already an enrichment win because most horse toys and puzzles promote behaviors like feeding or problem solving. The DIY scent board is low-key, relaxing, pure sensory enrichment.
You’ll see your horse use their sense of smell when you install a scent board. And when they smell something especially interesting or unfamiliar, you might get to see a very cute lip curl! This is called the Flehmen response and happens when your horse wants an extra thorough sniff of a new scent.
Ready to jump in and build a scent board? Here’s how to make it, step by step.
How to Build the DIY Scent Board for Horses
There are several ways to make a sturdy scent board for your horse. We’ll show you the basics, and you can follow this plan exactly or adjust for your needs.
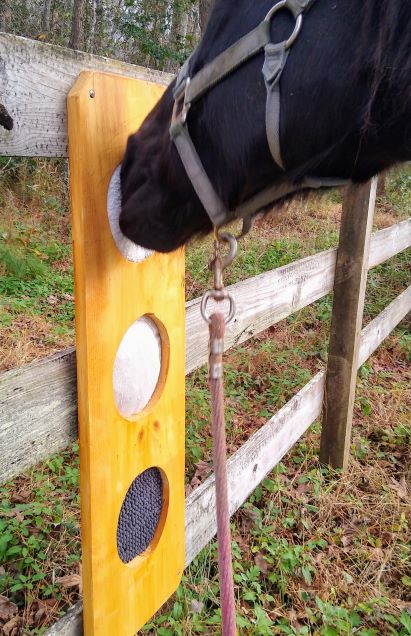
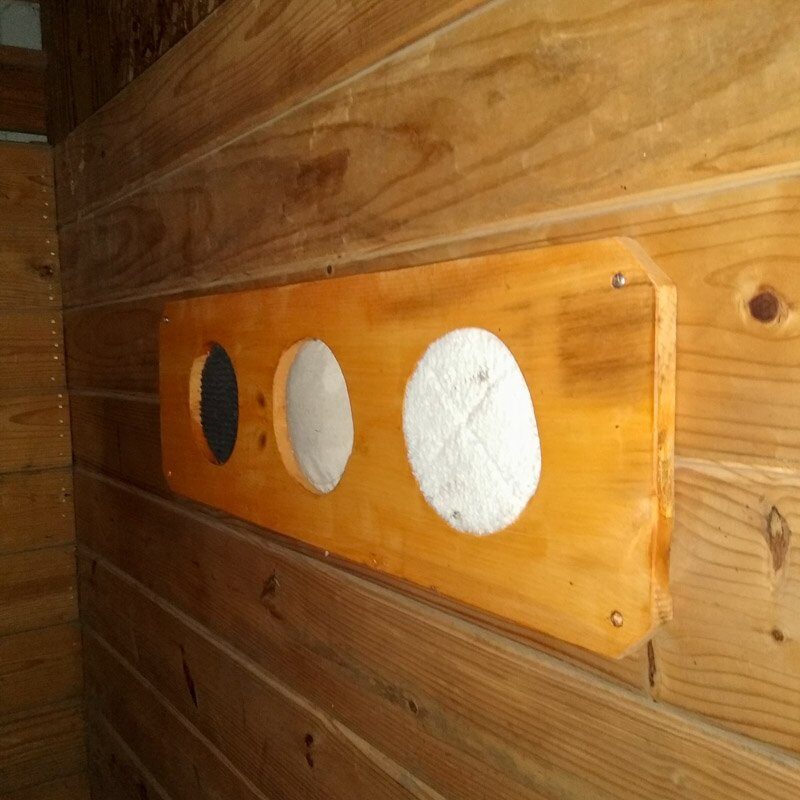
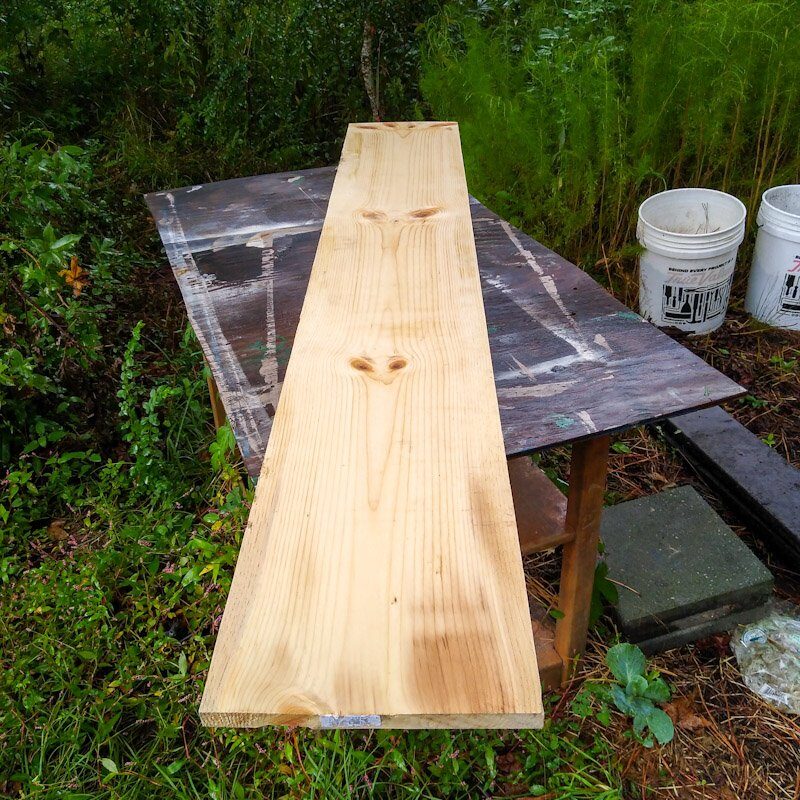
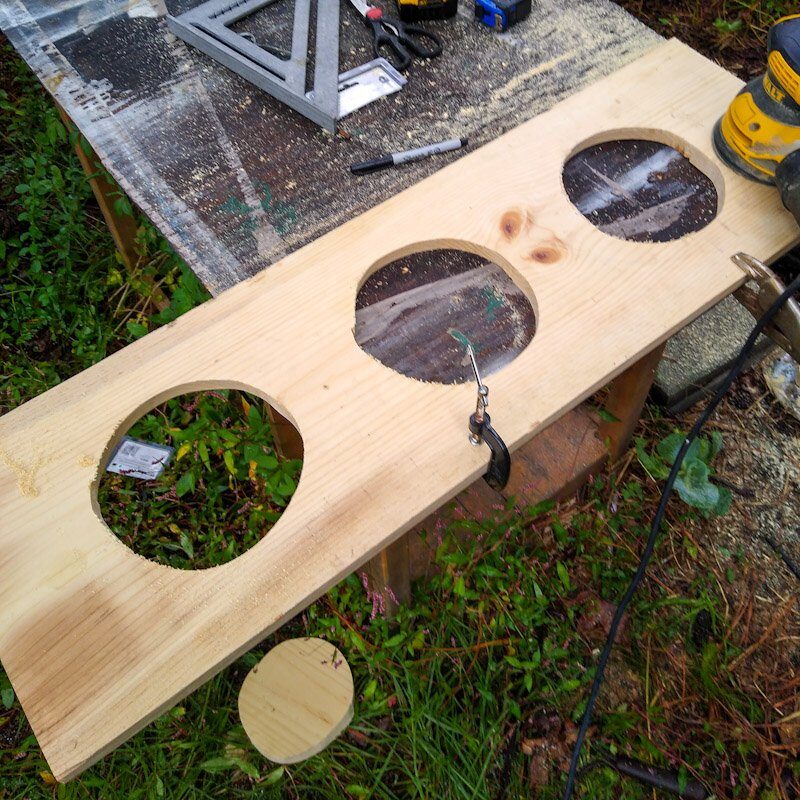
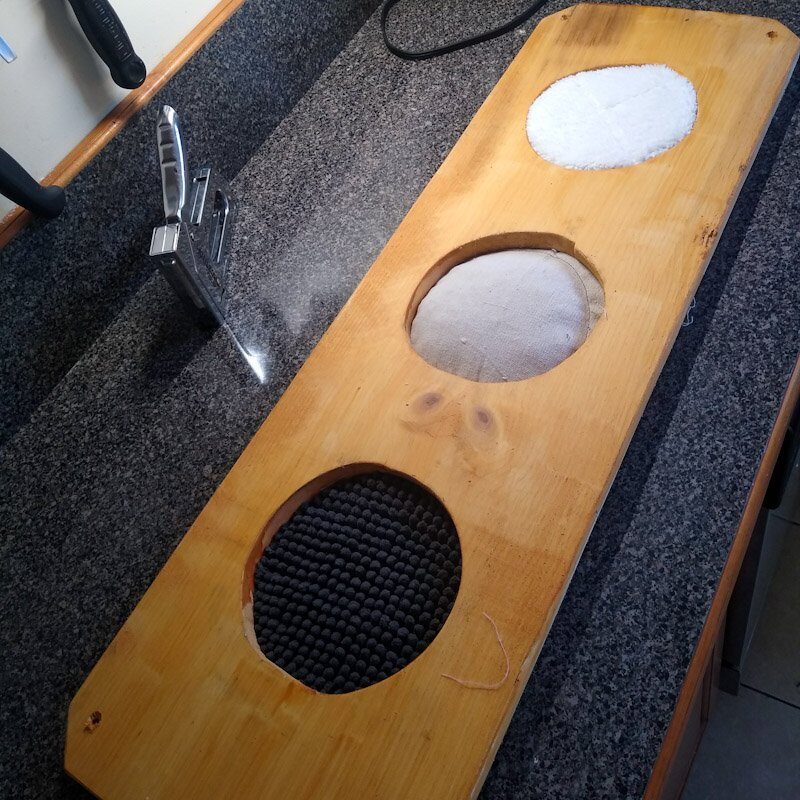
The board shown in this article is made of pine wood with three fabric sections for applying scents. You’ll see three different fabrics for example purposes.
Your board can be smaller, larger, or have different fabrics. If you decide to vary the design, that’s okay – just keep enrichment safety as your top priority.
What You’ll Need
- Pine or hardwood board, 12″ wide – The board pictured here is 3ft/1m in length. To adjust the number of scent pads, make your board longer or shorter.
- Jigsaw
- Drill and standard fluted drill bit
- Orbital sander or sandpaper block
- Screws for mounting board
- Canvas or other heavy duty fabric for the scent pads
- Sewing machine
Optional Supplies:
- Circular saw: for cutting the corners and cutting the board to length – you can use the jigsaw for this, but it’s faster and cleaner with a circular saw
- Countersink drill bits – for making the mounting screws flush with the board surface
- Padding or fill for the canvas scent pads
Step 1: Make the Scent Board Frame
First, decide how many scent pads you want on your board. This DIY scent board has a generous three scent pads and is 3ft/1m in length. Plan 1 foot/0.3m for every scent pad.
Cut your board to length.
Now mark the corners off and saw off the pointed corners. This step takes only a few moments and is essential for stall safety! Don’t leave any sharp edges on your horse’s enrichment items.

Now mark the areas to cut out for the scent pads. Trace a circle for each scent pad onto the board. Perfection isn’t essential! Your horse won’t care if the holes are perfectly round or all the same size. If you do want them to be perfect, use a large coffee can or paint can to trace:
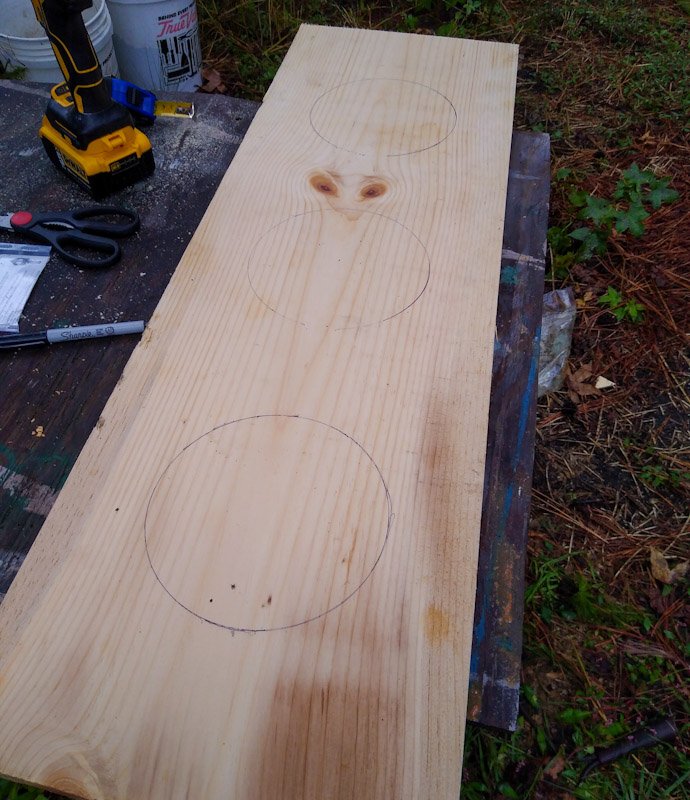
The holes pictured here are about 9 inches in diameter. Yours can be smaller or larger. I planned this DIY scent board with pads big enough for a horse to squash them with their nose.
Now take out your jigsaw and drill and get ready to cut some holes!
But Do You Have to Use a Jigsaw to Make the Scent Board?
It’s possible to make the scent board by skipping this step and just wrapping the board in fabric. But I recommend this design for durability and safety. The fabric attaches to the back of the board, so it’s recessed slightly. This makes it harder for a playful horse to grab or nibble on the fabric.
If you skip this section and wrap or glue fabric to the front of the board, it’s best not to use the scent board unsupervised. This one can stay in a stall permanently for most horses.
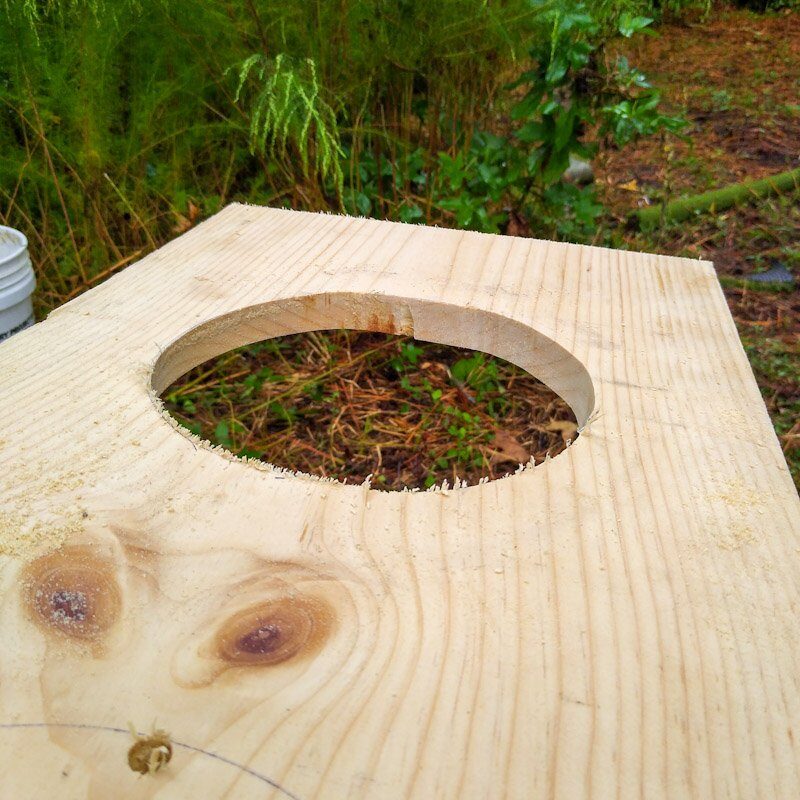
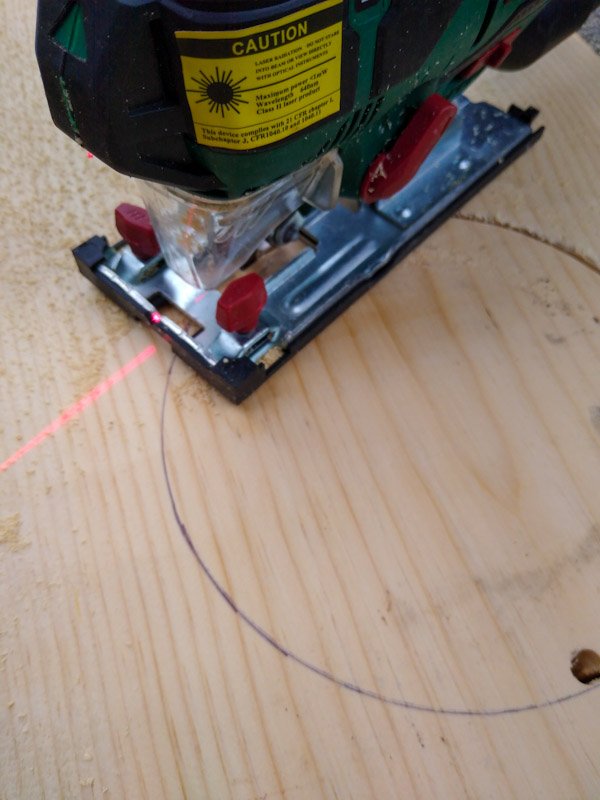
Step Two: Cut Holes for the Scent Pads
A jigsaw’s skinny blade makes curved or round cuts. You’ll guide the saw along the tracing you made. Jigsaws are easy to use, so if this is your first jigsaw rodeo, have no fear! Just remember to use eye and ear protection when working with tools.
First, drill a pilot hole in the board to accept the jigsaw blade. It should be slightly larger than the saw’s blade so that the blade moves freely when you turn it on.
Clamp down your board securely, insert the jigsaw blade, and turn on the saw. If your DIY scent board is clamped down tight, there shouldn’t be much shaking or vibration. Begin to cut by pushing the jigsaw slowly along the circle you traced. Let the saw do the work and guide it into the curve as you go.
Before you know it, the inner circle will drop away and you’ll have a nice round hole in your board. Repeat with the other tracings until all the cuts are complete.
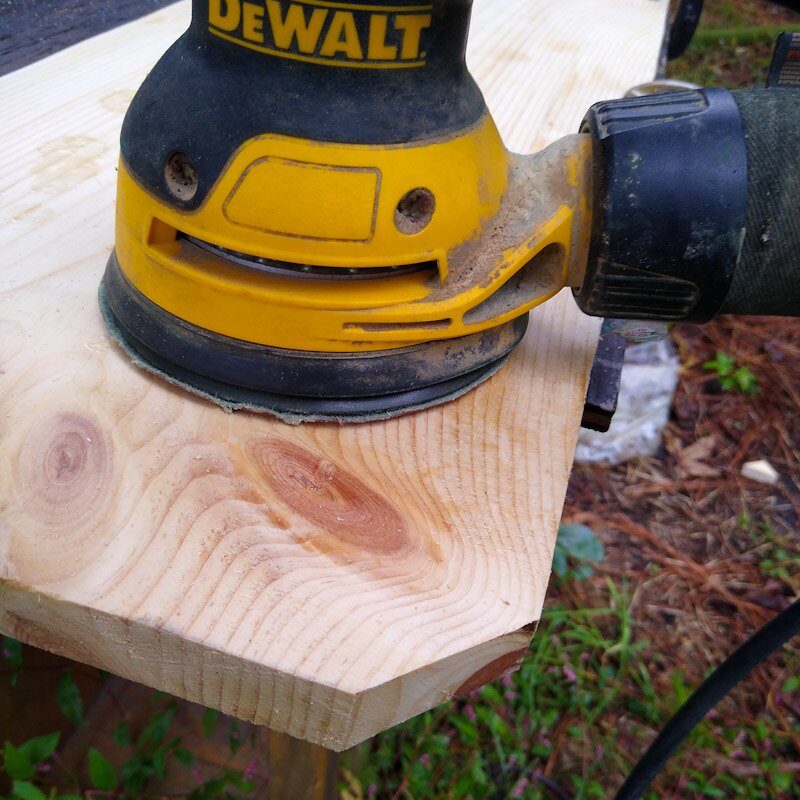
Step 3: Sand the DIY Scent Board
All wooden DIY enrichment items should have their edges sanded down. A freshly cut wooden edge is surprisingly sharp! It only takes a few extra minutes to sand all the edges of the board if you have an orbital sander. If you’re using sandpaper and a block, it’ll take slightly longer but is still very important. Sand down all your cut edges before continuing.
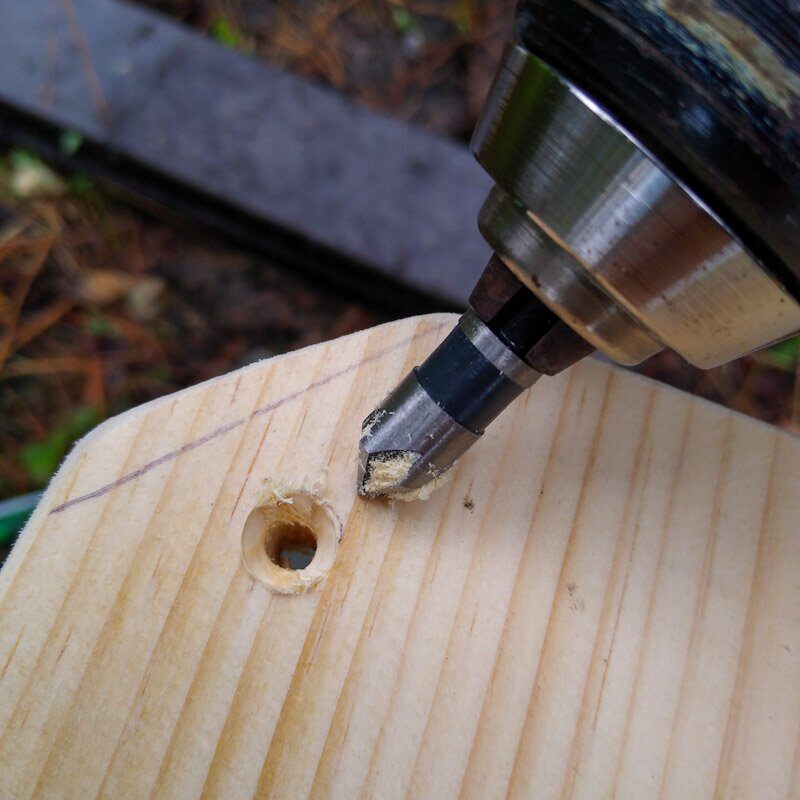
Step 4: Drilling the Mounting Holes
This is a permanent or semi permanent stall enrichment for your stable. Complete this step to add holes for easily mounting the scent board to the stall wall.
Mark out a dot at each corner and use a normal fluted drill bit to make a pilot hole at each. For extra polish and safety, use a set of countersink bits to create a shallow hole for the head of the screw to rest. This sinks the screw’s head into the surface of the board, making an extra-secure attachment. It’s also safer than having even a small amount of screw exposed.
Optional: Stain or Paint
At this stage, you can sand or paint your board to match your barn or in any color you like. A wood sealer or paint increases the board’s durability. It’s a must if you want to use the DIY scent board in a pasture.
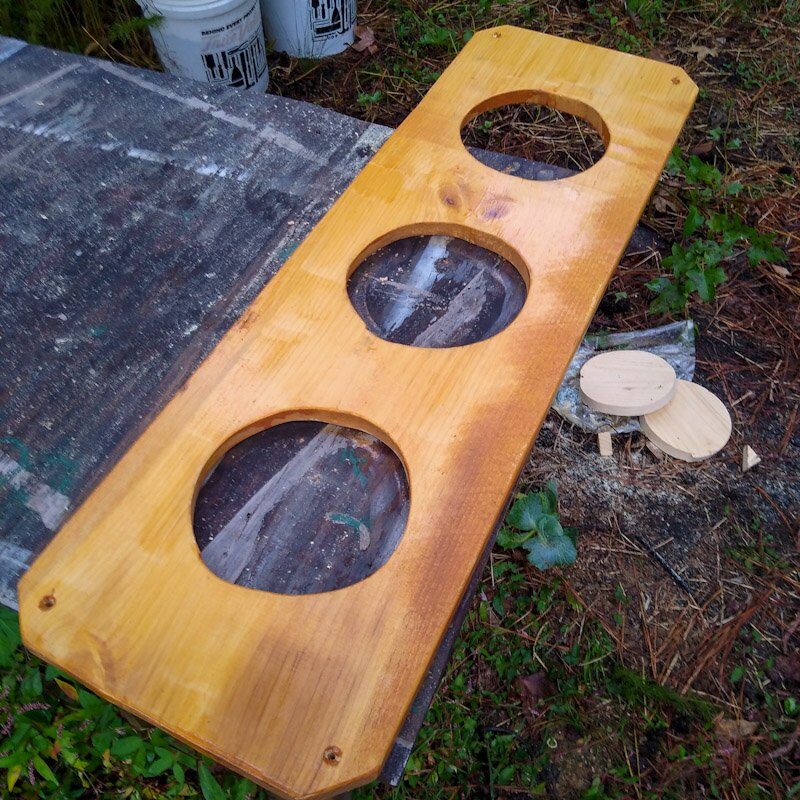
If you stain or paint your board, let it dry completely and sit in the open for several days so that all smell dissipates. After all, this is a scent enrichment for your horse! Who wants to smell paint?
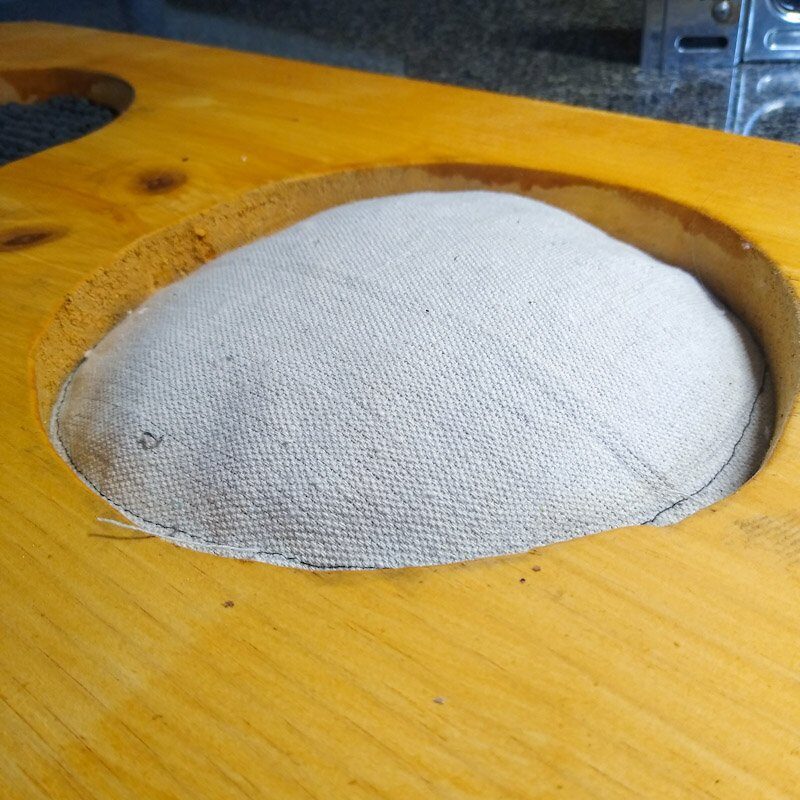
Step 5: Make the Scent Pads
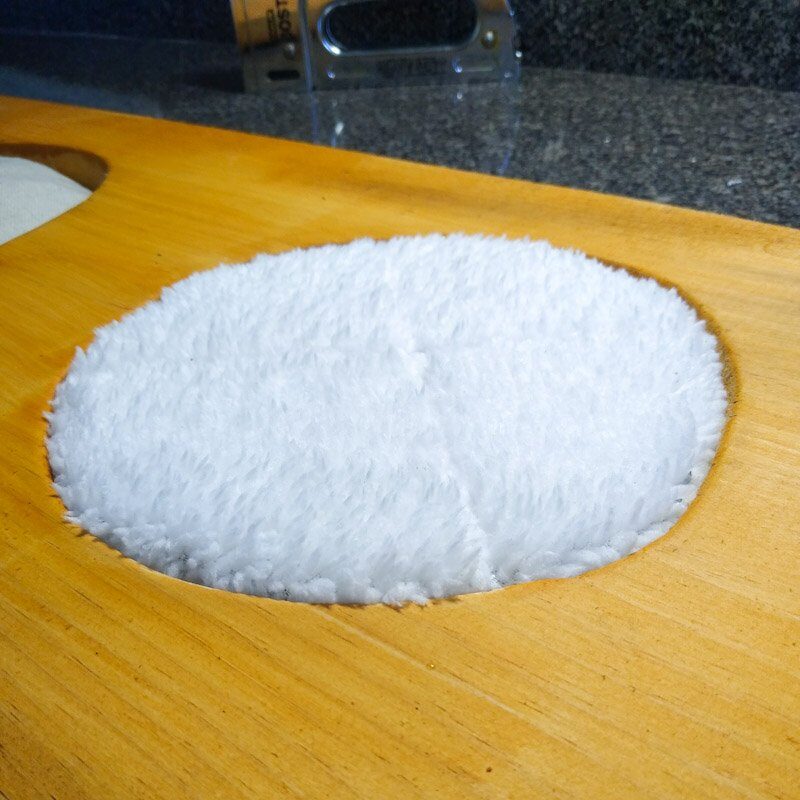
With the wood frame finished, it’s time to go indoors and make the scent pads. The scent pads are the pieces of fabric on the DIY scent board that your horse will sniff. The scent pads hold the smells and provide a soft surface that’s gentle on your horse’s nose.
What Material for Your Horse’s Scent Enrichment Pads?
You have options when it comes to material. Plain cotton canvas is always a good choice. Natural materials like cotton or wool seem to hold scent a little better than synthetic fabrics.
For unsupervised use, a plain flat fabric is best. Textured fabric like the nubby gray chenille you’ll see in this article are best used under supervision just in case your horse tries to nibble the fabric.
Different Ways to Make the Scent Pads
For a no-sew scent pad, cut several squares of fabric and use a staple gun to fasten them to the reverse side of your scent board. Attaching the fabric to the back ensures that there are no edges or loose pieces for your horse to bite.

For this scent board demo, I’ve added some soft fill to some of the pads for added texture. You’ll need a sewing machine to complete this step, but it adds a nice sensory touch.
If you don’t have a staple gun, you can use heavy duty wood glue, like Gorilla Glue or similar. To use glue for the scent boards, stretch the fabric as straight and tight as possible and weight it down during the drying process.
A staple gun is the most secure way to attach the scent pads. Turn the board over, place the fabric on the reverse side, and staple it down. Pull it snug and continue stapling all the way around until the fabric is well attached.

Step 6: Install and Add Scent
For the final step, you’ll choose where to use your horse’s new sensory enrichment, and install the DIY scent board. Then choose the scent you want to use, and apply it to the board.
Here, you have even more enrichment options!
Where to Use the DIY Scent Board
This enrichment item is perfect for use in your horse’s stall. You can also attach it to a sturdy wooden fencepost in a pasture. For safety, the DIY scent board should always be securely mounted and not used flat on the ground.
Make sure to place your horse’s scent board away from food and water locations in the stall. You won’t be using an overwhelming amount of scent and your horse will probably enjoy the board. But just in case you discover a scent they don’t care for, give your horse the option to not smell the scent enrichment if they choose.
What Scents to Use for Horse Enrichment?
The fun part: picking your horse’s enrichment scents! This is sensory enrichment but also a bit of aromatherapy for your horse.
If you have a multi-pad DIY scent board like the one pictured in this article, you can mix and match different smells. If you have a single pad, choose one scent (or a blend if using essential oils).
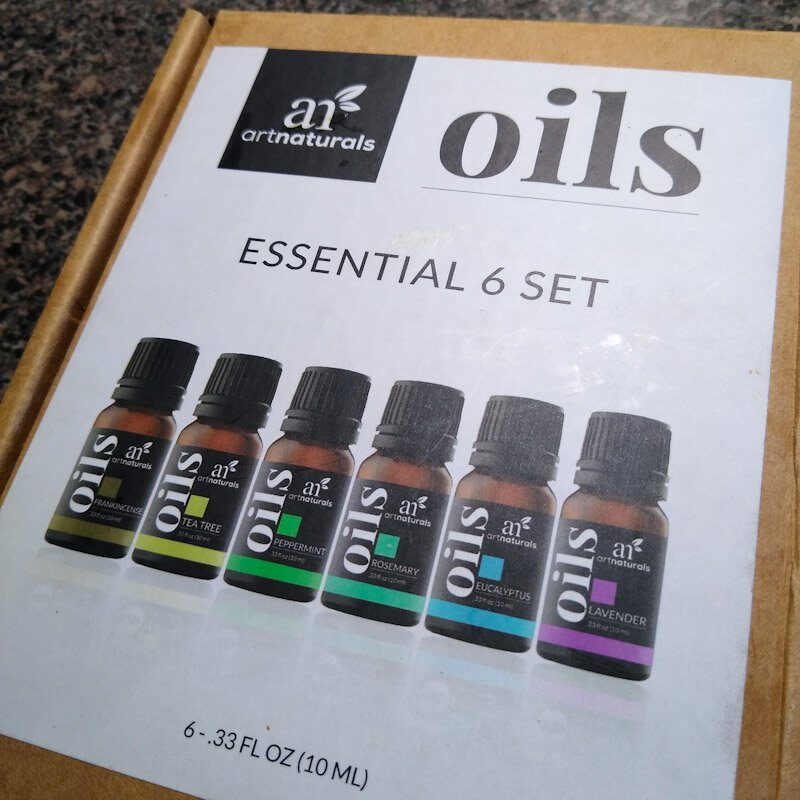
Any scent is fair game for your horse’s DIY scent board. Essential oil kits are an easy way to get started with scent enrichment. You can apply a drop of essential oil straight to the scent board, or make a simple spritzer. Also try fresh or dried herbs and spices.
For social enrichment, borrow a brush and groom one of your horse’s close equine friends, then brush your DIY scent board with it. Being able to smell their bestie can make your horse feel more connected during stall time.
Scent Board and Scent Enrichment Safety
The DIY scent board is a safe stall enrichment item. But like all horse enrichment, keep basic safety tips in mind.
Introduce scent enrichment to your horse slowly, preferably in an open space. The scent board and new smells aren’t harmful, but it’s normal for horses to be nervous of new objects. If your horse tends to be fearful of new enrichment, adding the scent of familiar horses is the best way to reassure them that the board is safe.
Supervise your horse and watch how they use the board before leaving them alone with it. The DIY scent board can be a great enrichment for stall time, but you’ll need to make sure that your horse doesn’t try to bite or consume any part of the board or fabric.
Only use human-grade scent products for this enrichment. Nontoxic, natural scent sources are best. Also, avoid adding scents that smell like food to your horse. If your equine friend is especially food-motivated, this can lead to unsafe licking or biting of the board.
Install your scent board securely with no screws or nails above the level of the wood. And if the DIY scent board gets damaged, remove it from the stall and repair it before using it again.
Related Enrichment
The DIY scent board for horses is sensory enrichment. For more stall or pasture enrichment that gives your horse sensory variety, try:
How to Use Music and Sounds as Horse Enrichment
Sensory Texture Board – an enrichment board that provides different textures for sensory variety
Stall Enrichment Ideas for an overview of other ways to keep a stalled horse occupied
Pingback: Scent Enrichment for Horses: How to Make Essential Oil Sprays - Enriching Equines