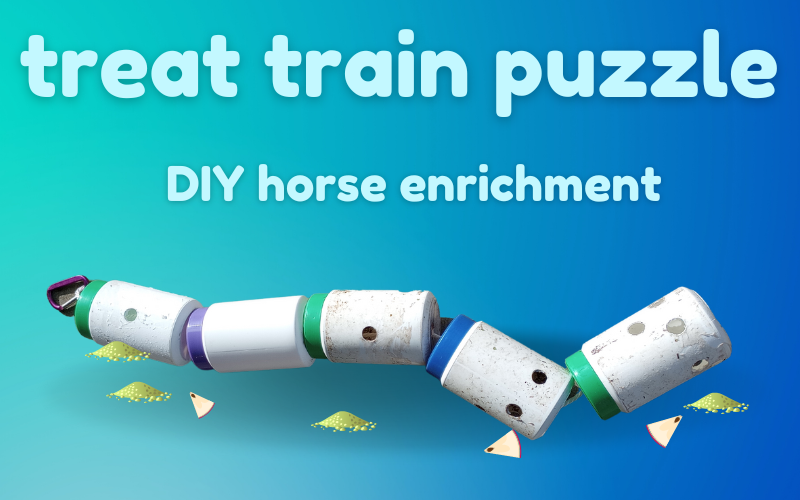
Reuse your horses supplement containers or any plastic canister around the home into a fun and mentally stimulating enrichment item! The DIY treat train for horses is easy to make and is customizable for your horse’s needs! Here’s how to make this cute pasture enrichment, step by step.
What is the DIY treat train for horses?
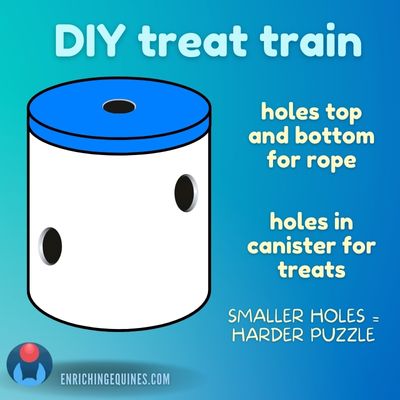
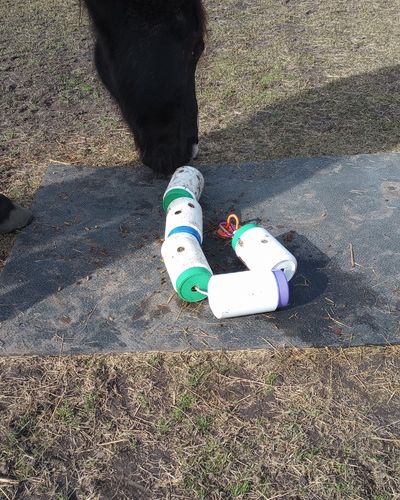
This toy is a do-it-yourself enrichment item made from plastic jars or canisters attach to each other by one long piece of rope.
By adding holes to the sides of the jars and putting food inside, you’ll create a long lasting and engaging enrichment activity.
The DIY treat train for horses is a puzzle feeder. In other words, it has to be used in a certain way to release the food, and it gets your horse using their brain as well as their fine motor skills.
The DIY Treat Train is Great Horse Enrichment
Enrichment for horses encourages their natural behaviors. In other words, it’s anything that you do that gets your horse acting more like a horse, foraging for food included.
Enrichment for your horse has tons of benefits, and in this case it’s just playing fun! Treat based or food-based enrichment is something that most horses really enjoy.
Keep in mind that a toy like the DIY treat train is one small part of an enriched environment for your horse. Horse toys are like frosting on a cake – you’ll need to give your horse a solid base first with space, opportunity to socialize, and plenty of forage.
Then, toys like the treat train or other DIY canister feeders provide crucial interest and stimulation.
Where to Use the Treat Train
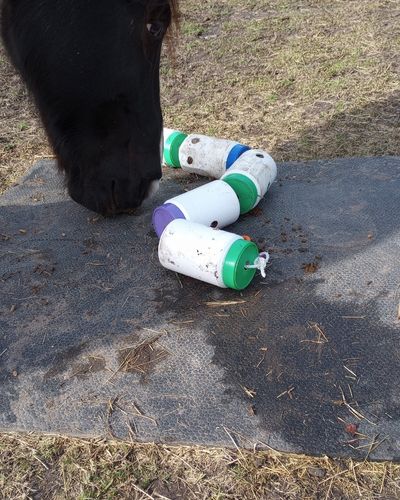
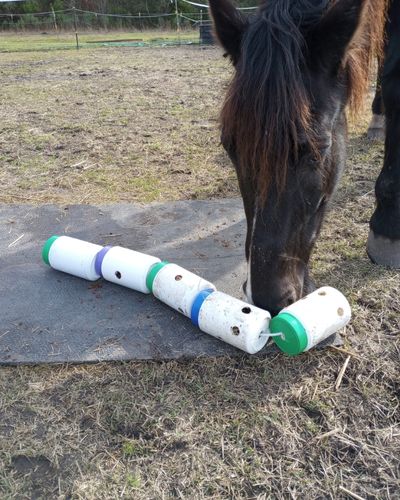
This equine enrichment item can be used in your horse’s stall or pasture.
As shown in the instructions, you’ll attach a clip to the end of the rope so that the train can be secured to an anchor or tie ring at ground level.
Anchoring or clipping in the toy keeps it in one place, so if you’re dealing with winter mud you won’t have to fish this item out of a dirty mud puddle. It also prevents your horse from picking the entire thing up and throwing it around.
How to make the DIY treat train for horses
Supplies and Tools
- Empty food grade canisters, two or more (3-6 is ideal)
- Cotton or polypropylene rope (not baling twine)
- Power drill with hole saw attachment
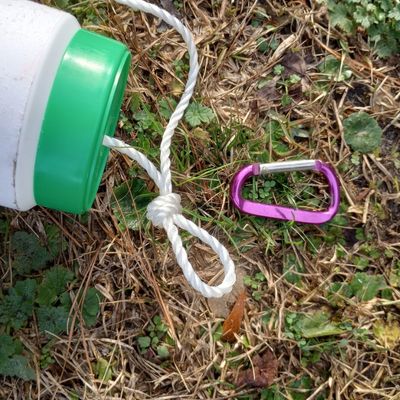
- Carabiner or bullnose clip
- Treats or feed
Step 1: Source and Prep the Containers
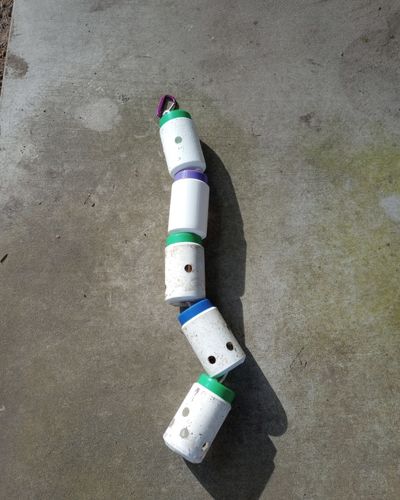
You’ll need from 2 to 6 containers to make the “cars” of the train.
Any sturdy plastic container will work for this toy, but I recommend higher quality containers such as used supplement jars, name brand peanut butter jars, etc.
They are made of more solid plastic and have higher quality lids. This means that the toy will last longer, standing up to use by your horse but also repeated filling with treats by you.
Do not use containers that previously held chemicals, and don’t use metal cans. Food grade plastic is the way to go.
How Many Containers for the Treat Train?
You get to choose the number of canisters you use for this project. The number of jars in your horse’s treat train affects how long it takes to empty the toy.
With more canisters, treats will fall out of the holes along the whole “train” as the horse noses it around. At the same time, you can fit more food into the toy or space a small amount of treats across the whole train.
A minimum of three and maximum of six containers tends to work well.
Step 2: Make the Holes for Treats
The treat train drops food from the holes as the horse rolls the toy around. You’ll need to drill holes in each canister for the treats to come out, and in the bops and bottoms (that’s the next step).
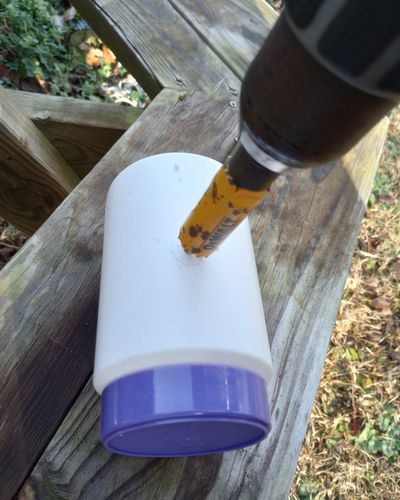
The best tool for this job is a hole saw. This handy attachment fits into a power drill and lets you cut clean holes without wandering around. It’s a much better tool than a large drill bit for this job.
Hole saws make all kinds of DIY enrichment (upcycling dog toys into horse treat balls, anyone?) fast and easy. You can use them over and over, so it’s a lot of value for one small tool.
The kit I use is this DeWalt complete hole saw kit from Amazon. If you don’t need quite that much saw, you can get a 1-inch size saw on this page for about ten bucks.
The more holes you add, the easier the toy will be to empty. The fewer holes and the smaller they are, the longer it will take for the treats to come out.
Start each hole slowly and carefully. Let the saw do the work of chomping through the plastic – don’t use too much pressure.
What If You Really Don’t Have a Hole Saw?
A hole saw makes DIY treat toys SO fast to create. We’re talking ten minutes in and out for this entire train.
But if you aren’t able to use power tools, you can VERY CAREFULLY make a hole in the canister using a sharp object like an ice pick, then use a pair of hand pruners or tinsnips to cut holes in the jar.
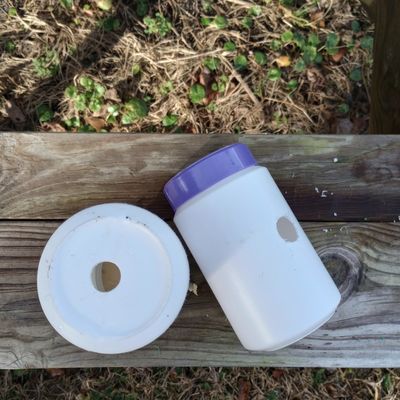
Step 3: Make Lid and Bottom Holes in the Treat Train
A soft rope passes through each canister to connect the “train cars.” This lets the whole toy roll around as one.
Make a hole for the rope in the lid and base of each canister. It’s okay if they are slightly off center.
The end of the last canister may not need a hole – you can knot the rope and keep it inside the canister for a cleaner look.
Step 4: Make the Treat Train!
Time to connect the cars! Fit the canisters onto the rope by passing the rope through each one. It looks cuter if all the lids face the same direction, but that is optional.
To make it easier to get lead wrote through the canisters, take the lids off and put the rope through lid and canister separately so that you can better control the rope as it goes through the jar.
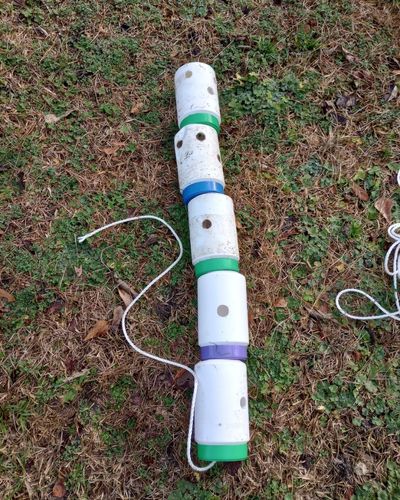
Fit the canisters tightly against each other. There should not be excess rope in this horse enrichment item – just enough for the canisters to flex. Excess rope is a safety hazard.
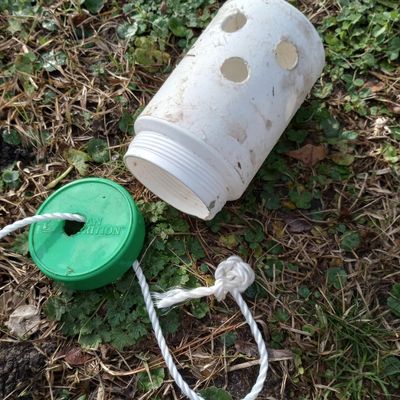
When you finished, tie a big knot at the end of the rope to secure the last canister in the train, and a loop on the other end of the rope for a clip.
Another safety note: Pull the knots tight! Double knots are best. My knot came loose as my horse played with it! You’ll end up with canisters all over the pasture and a hazardous loose rope if this happens. Take it from me, make sure the knots are super tight!
Step 5. Add the treats!
The DIY treat train for horses isn’t complete without the best part: treats!
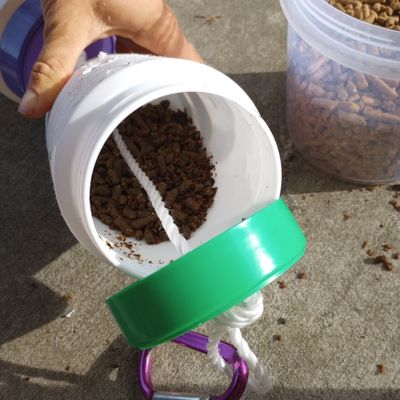
You can use any horse safe food item that fits into the canister and will pass through the holes.
Good choices for your DIY treat trade include diced carrots, apples, celery, bits of crunchy pretzels, and peanuts.
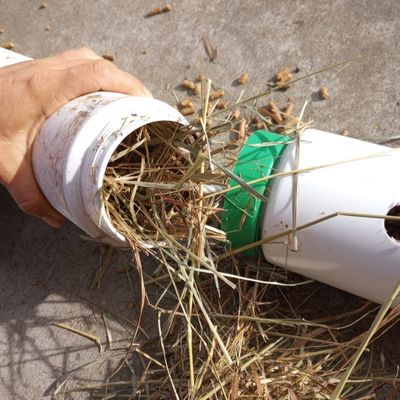
You can also use puzzle feeders like this to give your horse extra forage, like hay pellets. This is ideal for horses who need lower calorie diets or eat forage based diets.
Mixing treats or using a different food for each part of the train is a great way to increase variety and enjoyment.
Using the DIY Treat Train
To finish the treat train, I recommend a clip at the end (if you use an old lead rope, you’ll get a clip automatically).
Secure the clip to a ground anchor in the pasture. Ground anchors are an ideal, budget friendly way to secure enrichment or even hay nets to one location in the horse’s paddock, and are available on Amazon.
For more info on using and installing ground anchors, this post has all the details!
For use in the horse’s stall, install a tie ring a few inches from the ground and use that.
Then, let your horse enjoy!
Remember to take it slow and easy with new toys, and don’t use the DIY treat train in your horse’s stall until they’re comfortable with it outdoors.
Safety Notes
Safety always comes first with equine enrichment. There are a few notes to mention about this toy:
- Fit the canisters tightly onto the rope with only a little slack between them. This prevents the rope from being able to wrap around a hoof.
- Don’t use this enrichment if your horse wears shoes or a halter in the pasture.
- Supervise your horse’s use of this item for at least the first few sessions before using it unattended.
- Make sure your horse knows how to use enrichment before introducing this toy.
Lastly, if your horse seems unusually nervous about this or other enrichment items, have a look at this article on neophobia and enrichment – and how to overcome it.
Related Enrichment
The cardboard roller treat puzzle is a another great upcycle DIY!
The DIY water bottle puzzle uses wide mouth plastic bottles to make a foraging enrichment.
The swinging snack toy is similar, but hangs overhead for extra challenge.