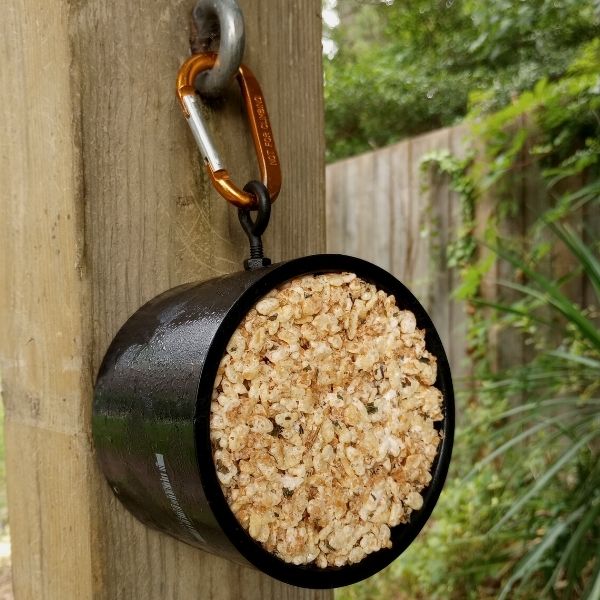
Licking toys are lots of fun for horses and are a great way to keep your stalled horse entertained. If your horse likes Likit or Stall Snack toys and you want a budget friendly and (slightly) more health conscious option for your horse, this is the project for you. This DIY licking treat for horses is simple to make and you can reuse the frame over and over. Plus, the DIY stall snack recipe is customizable for the perfect flavor and ingredient profile! Here’s how to make this awesome horse toy.
What is a DIY Licking Treat for Horses?
A licking treat for horses is like an equine lollipop. A frame or spindle holds a sweetly flavored insert that either rotates and spins, or slides into the frame so that a horse can lick but not bite at the treat. The horse uses the toy by licking.
Let’s start by saying I’m a big fan of Likit and Stall Stack-style toys for horses. They’re easy to buy (including refills) and simple to use. In moderation, Stall Snacks etc can be awesome for relieving boredom and keeping a horse entertained in a stall. They’re ideal for a once-in-a-while treat or occupying a horse before a hoof trim or vet visit.
But this DIY Stall Snack has lots of perks.
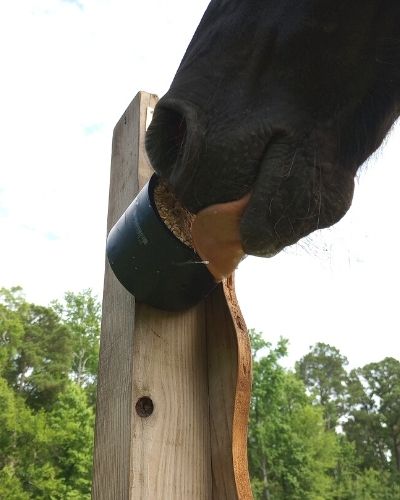
First, it puts you in control of the ingredients and uses much less sugar than a Stall Snack toy, which is more or less a lollipop for horses. By reducing the sugar in this DIY hack, you can offer this toy more frequently with less worry about nutrition. You can also power-load your DIY licking treat with nutrient-dense ingredients like flax and chia.
Second, it’s very budget-friendly. I love equine enrichment that’s low cost, especially if you’re on a strict budget or have a whole stable of horses who need boredom relief. In exchange for time and some basic tools, you’ll get a licking toy whose base supplies and ingredients cost a fraction of buying a Likit or Stall Snack.
Benefits of Licking Toys for Horses
Licking toys are great equine enrichment. Licking is a self-soothing activity for many horses, so using a licking toy can create calm and relaxation. It’s perfect for horses who are nervous and need a distraction – think at the end of a trailer ride, or while waiting in the stall for the vet or farrier.
We’ve covered smear boards as an ultra easy licking option for horses. Variety is always a good idea, though, and lollipop-style equine licking toys create a longer-lasting enrichment experience.
If you don’t already own a Likit or Stall Snack, I definitely suggest adding one of these toys to your equine toybox – and once the first insert is all licked up, make your own refill using these instructions so you can use the toy again and again.
As you make and use this awesome toy, remember: this enrichment has less sugar than a standard Likit or Stall Snack for horses, but it’s still a grain-based food toy. It’s long lasting for most horses, but not a treat that I recommend offering every day – moderation is key! Use this toy for special occasions. If your horse really enjoys it and makes it last a long time, it’s a good option once each week or two.
If you’ve read this far and realized that your horse can’t have this recipe due to metabolic sensitivity, don’t despair! Try the Peanut Butter Licking Mat for a low-carb licking experience, and use the same concept for the awesome DIY Peanut Butter Licking Log toy.
Make Your Own DIY Stall Snack
In this post we’re going to make a horse licking toy from scratch. It’s not hard at all, but you will need a drill and some basic kitchen equipment.
What You Need
- One PVC coupling, 4 inch diameter
- One eyebolt
- Nuts that fit the eyebolt (2)
- Drill and drill bit
- Saucepan or soup pot
- Plate and parchment paper
Ingredients
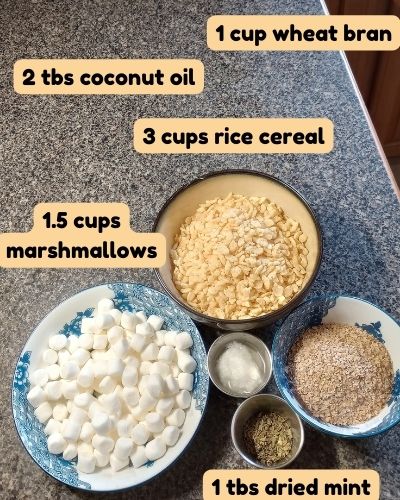
- 3 cups puffed rice cereal
- 1.5 cups marshmallows
- 1 cup wheat bran
- 2 tablespoons coconut oil
- 1 tablespoon dried mint (optional)
- 1/2 cup flax (optional)
Supplies for the DIY Stall Snack
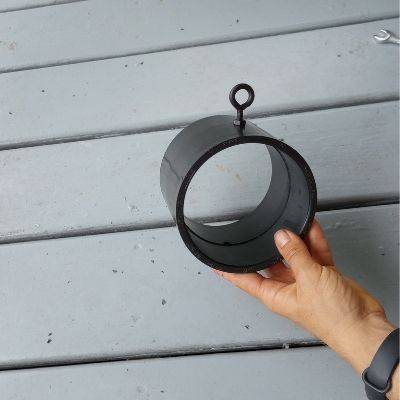
The frame of our DIY licking toy is a piece of pipe with an inside diameter of about 4 inches. That’s the perfect size for your horse to lick – not small enough for them to get inside their mouths, but not so big that you need too much of the treat mix.
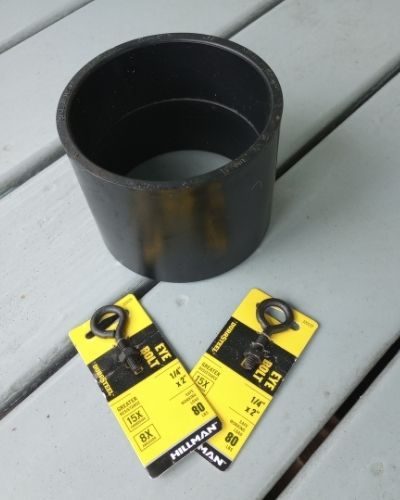
This PVC coupling is what I used in these instructions. You can buy it from Amazon directly, or pick it up at a local hardware store.
You’ll use the eyebolt to securely hang the DIY licking toy in your horse’s stall. Pick up a pack of nuts that fit the eyebolt – they’re what holds the bolt and pipe together.
Step One: Install the Eyebolt
Mark a spot right in the center of the pipe and drill a single hole. You can use any cordless drill. The bit should be the same width as the eyebolt’s shank so that it screws in easily but doesn’t wobble around.
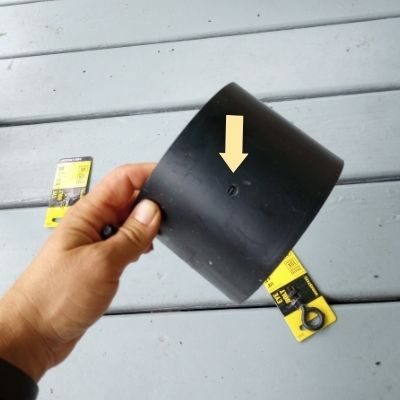
Slip a nut onto the eyebolt and spin it all the way up the bolt. Stick the shank of the eyebolt through the hole, turning if needed until it slips through. Put a second nut on the eyebolt end, and screw both eyebolts until they’re very snug. Use a small wrench to get the nuts extra-tight if you have one on hand.
Step Two: Make the Stall Snack Refill Mix
Head to the kitchen for this stage of the project.
Put a plate on the kitchen counter and place a square of parchment paper on the plate. Place your new DIY licking toy frame on the plate/paper, an open end up.
Melt the coconut oil in the saucepan on low heat. When it’s warm, add the marshmallows and stir constantly until they melt into a white goo.
1.5 to 2 cups of marshmallows looks like a lot at first, but marshmallows are mostly air. You’ll be left with a much smaller amount of marshmallow base after they melt.
When the marshmallows are melted, add all the dry ingredients and stir quickly. The mix will be sticky, but work quickly and stir everything together as evenly as possible.
Step Three: Fill the DIY Licking Toy
Empty the stirred mix directly into the PVC pipe and use the back of the mixing spoon to squash the mixture down. The mix will stick to the spoon, but working in sweeping motions will keep everything going in the right directly.
Squish your mix down as tightly as possible. If you’re a little short on mix, that’s OK. The “bottom” of the mix now will be the side facing the horse when you hang the toy up.

With the toy filled, stick the plate/parchment paper/PVC in the freezer to let it set. If you don’t have the freezer space, a refrigerator will do. This step hardens the marshmallow base into a strong, lickable solid. If you’ve ever eaten a Rice Krispie Treat that’s been in the fridge, you’ll know what the chilling step is for.
After about an hour, remove the toy from the freezer and twist it to remove it from the parchment paper. Your DIY stall snack licking treat is ready to go!
Using Your DIY Stall Snack Licking Toy
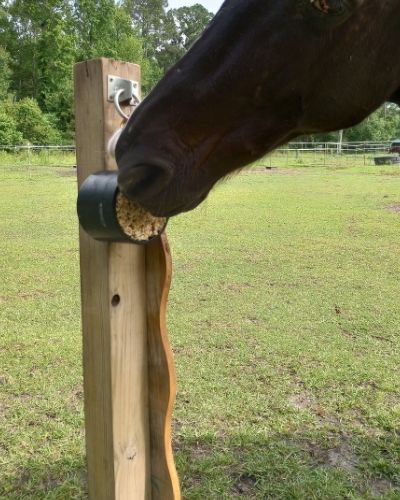
Use this toy in your horse’s stall, or anywhere with a flat backing wall. This article shows it on a freestanding wooden post, which is OK – but it works best against a solid wooden wall.
You can tie the toy up using baling twine, but a carabiner clip and tie ring make for a more secure, easy-to-use toy. Make sure to hang it around the height of your horse’s withers, or a little higher. It should be out of reach of your horse’s hooves.
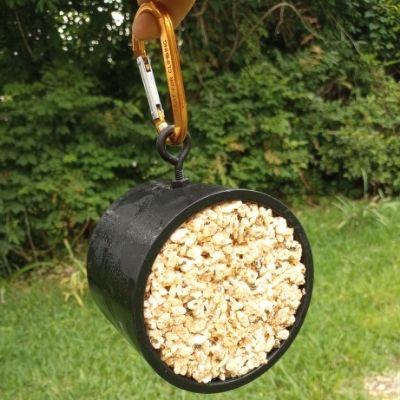
As with all horse toys, you should supervise your horse when they use this toy at least for the first few times. You’ll need to make sure that they understand how to use the toy by licking the insert instead of biting the frame. Safety first – if they try to crunch on the PVC instead, remove the toy and try again later. A little applesauce or molasses on the surface of the toy can help teach your horse that licking gets the best results.
Variations
The DIY stall snack recipe is very customizable. All you really need are marshmallows and some kind of grain product – rice cereal works well because it’s mostly air, so you get a lot of licking but fewer calories.
You can use any plant oil in place of the coconut oil. Vegan marshmallows are available online or in specialty stores if you prefer (marshmallows contain gelatin, which is an animal-sourced protein).
The wheat bran in this recipe adds some density and gives the horse more texture as they lick. You can omit it (add more rice cereal) or add another dry ingredient like oatmeal or coconut flour.
You can add whatever flavoring your horse prefers to the mix, or change it every time for added variety. Try vanilla, cinnamon, or orange extract and see how your horse responds – or use portions of the mix in a food preference test to find your horse’s favorite!